


How to register remote PEM agents to the PEM Server ?
Posted by FatDBA on April 3, 2021
Hi Guys,
During that quiesce period when I was away from blogging, I worked on lot of stuff, hence lot of contents to share 🙂 …. So here goes my another post. This one is about registering PEM agents with the PEM server as each PEM agent must be registered with the PEM server.
I have this PEM Server already configured (steps for configuring PEM server) and I have this new EDB AS 12 standby server which I would like to add to the PEM monitoring console. let’s get started!
192.168.20.128: PEM Server Host (canttowin.ontadomain)
192.168.20.129: Standby host (canttowinsec.quebecdomain)
I have already installed PEM agent (edb-pem-agent-8.0.1-1.rhel7.x86_64) on this remote standby host, let me show you that.
[root@canttowinsec ~]# yum install edb-pem-agent
Loaded plugins: langpacks, ulninfo
epel/x86_64/metalink | 7.0 kB 00:00:00
local | 2.9 kB 00:00:00
ol7_UEKR6 | 2.5 kB 00:00:00
ol7_latest | 2.7 kB 00:00:00
percona-release-noarch | 2.9 kB 00:00:00
percona-release-x86_64 | 2.9 kB 00:00:00
prel-release-noarch | 2.9 kB 00:00:00
Package edb-pem-agent-8.0.1-1.rhel7.x86_64 already installed and latest version
Nothing to do
Let’s go to the agent home directory and call the configuration utility called ‘pemworker’.
[root@canttowinsec bin]# pwd
/usr/edb/pem/agent/bin
[root@canttowinsec bin]# ls
pemagent pemworker pkgLauncher
Here we have to use few of the configuration options with their preferred values.
–pem-server : IP Address of the PEM backend database server.
–pem-port : Port of the PEM backend database server, default is 5432, but you have to check what port you have used.
-–pem-user : name of the Database user (having superuser privileges) of the PEM backend database server. This is a mandatory option.
–allow_server_restart: Enable the allow-server_restart parameter to allow PEM to restart the monitored server. TRUE is default.
–allow-batch-probes: Enable the allow-batch-probes parameter to allow PEM to run batch probes on this agent. FALSE is default.
-–batch-script-user: operating system user that should be used for executing the batch/shell scripts. NONE is default.
[root@canttowinsec bin]# ./pemworker --register-agent --pem-server 192.168.20.128 --pem-port 5444 --pem-user enterprisedb --allow_server_restart true --allow-batch-probes true --batch-script-user enterprisedb
Postgres Enterprise Manager Agent registered successfully!
Okay, so the agent is successfully registered with the PEM Server. Next we need to add the configuration to the agent.cfg file.
[root@canttowinsec etc]# pwd
/usr/edb/pem/agent/etc
[root@canttowinsec etc]# ls
agent.cfg
I am setting allow_streaming_replication to TRUE as this makes user to configure streaming replication, and next parameter is to provide path of CA certificates.[root@canttowinsec etc]# echo "allow_streaming_replication=true" >> /usr/edb/pem/agent/etc/agent.cfg
[root@canttowinsec etc]# echo "ca_file=/usr/libexec/libcurl-pem/share/certs/ca-bundle.crt" >> /usr/edb/pem/agent/etc/agent.cfg
So, now my agent configuration file will look like below.
[root@canttowinsec etc]# more agent.cfg
[PEM/agent]
pem_host=192.168.20.128
pem_port=5444
agent_id=2
agent_ssl_key=/root/.pem/agent2.key
agent_ssl_crt=/root/.pem/agent2.crt
log_level=warning
log_location=/var/log/pem/worker.log
agent_log_location=/var/log/pem/agent.log
long_wait=30
short_wait=10
alert_threads=0
enable_smtp=false
enable_snmp=false
enable_webhook=false
max_webhook_retries=3
allow_server_restart=true
max_connections=0
connect_timeout=10
connection_lifetime=0
allow_batch_probes=true
heartbeat_connection=false
enable_nagios=false
batch_script_user=enterprisedb
allow_streaming_replication=true
ca_file=/usr/libexec/libcurl-pem/share/certs/ca-bundle.crt
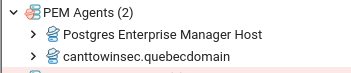
Now you will see your PEM agent already added to the PEM agents list under PEM console.
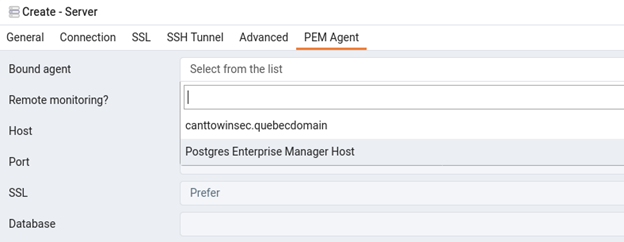
Next you can add your standby database to the list of managed server. Here you need to follow same steps what I have discussed in my last post about PEM configuration, please click here to directly go to that post. The only difference is that you need to select the bounded agent from the drop down list, here you see your new agent coming under drop list, rest all is same!
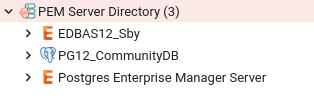
Once it’s added successfully, you will see the new server under the list, here I have named the connection ‘EDBAS12_Sby‘.
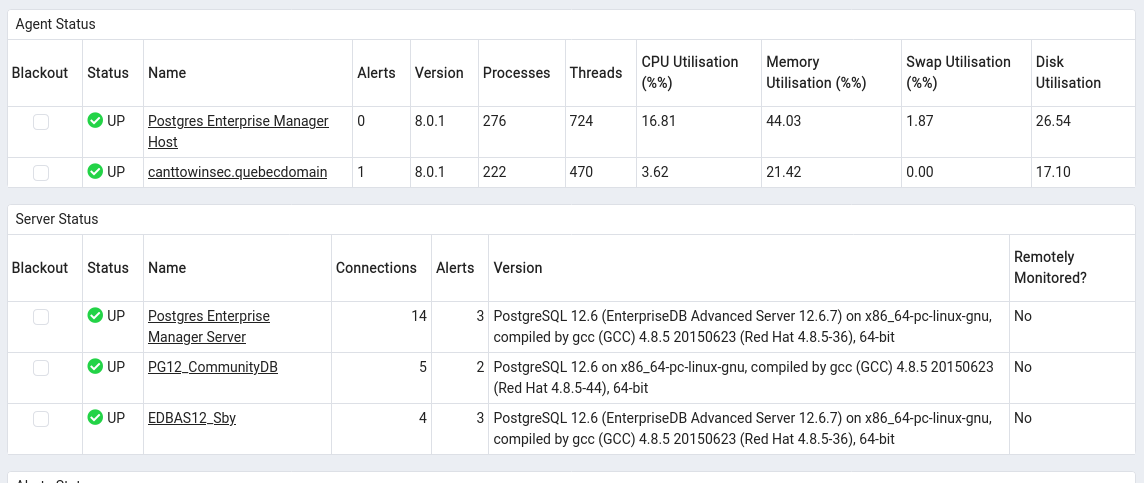
Now here is how the main landing page will look like, new agent and database with its status.
Hope It Helped!
Prashant Dixit

Leave a comment