During that quiesce period when I was away from blogging, I worked on lot of stuff, hence lot of contents to share 🙂 …. So here goes my another post. This one is about registering PEM agents with the PEM server as each PEM agent must be registered with the PEM server.
I have this PEM Server already configured (steps for configuring PEM server) and I have this new EDB AS 12 standby server which I would like to add to the PEM monitoring console. let’s get started!
192.168.20.128: PEM Server Host (canttowin.ontadomain) 192.168.20.129: Standby host (canttowinsec.quebecdomain)
I have already installed PEM agent (edb-pem-agent-8.0.1-1.rhel7.x86_64) on this remote standby host, let me show you that.
[root@canttowinsec bin]# ls
pemagent pemworker pkgLauncher
Here we have to use few of the configuration options with their preferred values. –pem-server : IP Address of the PEM backend database server. –pem-port : Port of the PEM backend database server, default is 5432, but you have to check what port you have used. -–pem-user : name of the Database user (having superuser privileges) of the PEM backend database server. This is a mandatory option. –allow_server_restart: Enable the allow-server_restart parameter to allow PEM to restart the monitored server. TRUE is default. –allow-batch-probes: Enable the allow-batch-probes parameter to allow PEM to run batch probes on this agent. FALSE is default. -–batch-script-user: operating system user that should be used for executing the batch/shell scripts. NONE is default.
Okay, so the agent is successfully registered with the PEM Server. Next we need to add the configuration to the agent.cfg file.
[root@canttowinsec etc]# pwd
/usr/edb/pem/agent/etc
[root@canttowinsec etc]# ls
agent.cfg
I am setting allow_streaming_replication to TRUE as this makes user to configure streaming replication, and next parameter is to provide path of CA certificates. [root@canttowinsec etc]# echo "allow_streaming_replication=true" >> /usr/edb/pem/agent/etc/agent.cfg [root@canttowinsec etc]# echo "ca_file=/usr/libexec/libcurl-pem/share/certs/ca-bundle.crt" >> /usr/edb/pem/agent/etc/agent.cfg
So, now my agent configuration file will look like below.
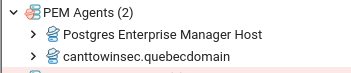
Now you will see your PEM agent already added to the PEM agents list under PEM console.
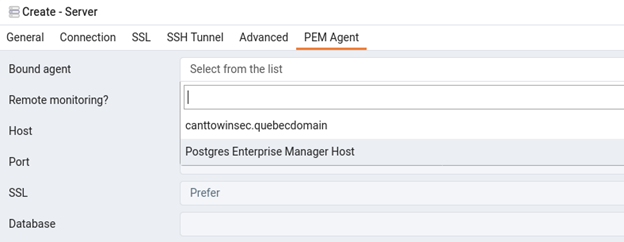
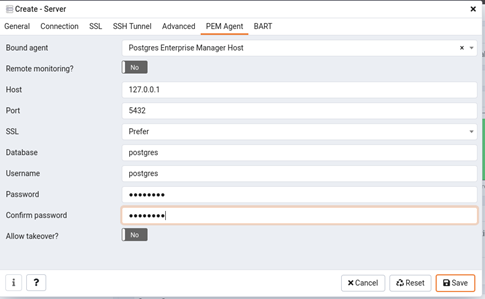
Next you can add your standby database to the list of managed server. Here you need to follow same steps what I have discussed in my last post about PEM configuration, please click here to directly go to that post. The only difference is that you need to select the bounded agent from the drop down list, here you see your new agent coming under drop list, rest all is same!
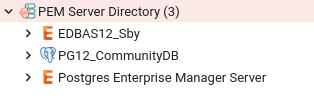
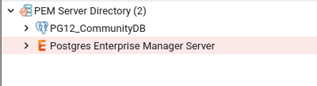
Once it’s added successfully, you will see the new server under the list, here I have named the connection ‘EDBAS12_Sby‘.
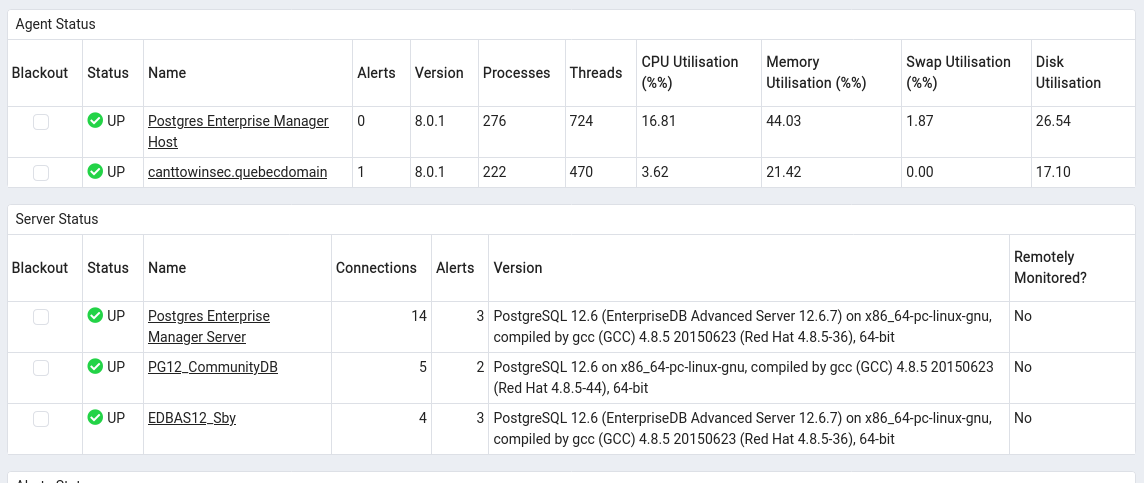
Now here is how the main landing page will look like, new agent and database with its status.
Many of you might be thinking after reading the title – Why to write about such a simple or rudimentary task, what is so tricky about installing EDB PostgreSQL software ? I know it’s quite easy and straight forward, but only if you are able to add the EDB repository to your server or register it, if you fail to add or register it, then it will be very difficult and becomes a tedious and a time consuming activity to install all of the software’s and their long list of dependencies. This post is all about how to deal with such situation, how to download the source RPMs and install them on the server if you are not able to add the EDB repository.
First step is to download the complete EDB’s tarball, I am downloading the complete tarball here as I don’t want to miss any dependent packages which are needed by the core components. This tarball is close to 1.8 GBs in size, you can download the file using below wget command, here you need to use your EDB credentials.
Now, once the tarball is installed, we can go and create the YUM local repository, though to create YUM repository is optional as you can also install RPMs directly, but will make your work lot easier otherwise you have to look out for dependencies manually. So, I have deceided to create the local repository here.
Once the above file is downloaded, unzip it. You will see list of all core and dependent packages/rpm, just like below.
Next I will create a directory which will be used as a repository container. [root@canttowin edb]# mkdir -p /home/user/repo
move all unzipped files/rpms to this new directory. [root@canttowin edb]# mv * /home/user/repo
change permissions of the directory. [root@canttowin edb]# chown -R root.root /home/user/repo [root@canttowin edb]# chmod -R o-w+r /home/user/repo
Now we can go and create the repository, for that we will use ‘createrepo‘ command. [root@canttowin edb]# createrepo /home/user/repo Spawning worker 0 with 1151 pkgs Workers Finished Saving Primary metadata Saving file lists metadata Saving other metadata Generating sqlite DBs Sqlite DBs complete
Now let’s create the YUM repository entry under /etc/yum.repos.d [root@canttowin edb]# more /etc/yum.repos.d/myrepo.repo [local] name=Prashant Local EDB Repo baseurl=file:///home/user/repo enabled=1 gpgcheck=0 [root@canttowin edb]#
All set! let’s try to look for any EDB’s package using this new local repository
[root@canttowin ~]# yum search edb-as12-server
Loaded plugins: langpacks, ulninfo
=============================================================== N/S matched: edb-as12-server ================================================================
edb-as12-server.x86_64 : EnterpriseDB Advanced Server Client and Server Components
edb-as12-server-client.x86_64 : The client software required to access EDBAS server.
edb-as12-server-cloneschema.x86_64 : cloneschema is a module for EnterpriseDB Advanced Server
edb-as12-server-contrib.x86_64 : Contributed source and binaries distributed with EDBAS
edb-as12-server-core.x86_64 : The core programs needed to create and run a EnterpriseDB Advanced Server
edb-as12-server-devel.x86_64 : EDBAS development header files and libraries
edb-as12-server-docs.x86_64 : Extra documentation for EDBAS
edb-as12-server-edb-modules.x86_64 : EDB-Modules for EnterpriseDB Advanced Server
edb-as12-server-indexadvisor.x86_64 : Index Advisor for EnterpriseDB Advanced Server
edb-as12-server-libs.x86_64 : The shared libraries required for any EDBAS clients
edb-as12-server-llvmjit.x86_64 : Just-In-Time compilation support for EDBAS
edb-as12-server-parallel-clone.x86_64 : parallel_clone is a module for EnterpriseDB Advanced Server
edb-as12-server-pldebugger.x86_64 : PL/pgSQL debugger server-side code
edb-as12-server-plperl.x86_64 : The Perl procedural language for EDBAS
edb-as12-server-plpython.x86_64 : The Python procedural language for EDBAS
edb-as12-server-plpython3.x86_64 : The Python3 procedural language for EDBAS
edb-as12-server-pltcl.x86_64 : The Tcl procedural language for EDBAS
edb-as12-server-sqlprofiler.x86_64 : SQL profiler for EnterpriseDB Advanced Server
edb-as12-server-sqlprotect.x86_64 : SQL Protect for EnterpriseDB Advanced Server
Great, so we are now able to look and install all our EDB packages through YUM, it’s lot easier than manually fixing dependencies and install core packages.
Today’s post will be all about monitoring your PostgreSQL database clusters using EDB PostgreSQL Enterprise Manager (PEM). Postgres Enterprise Manager is a comprehensive, customizable solution providing an interface to control and optimize your PostgreSQL deployment.
I will be doing the installation, configuration, adding servers to the console and will perform a live monitoring of the database while I will be generating some synthetic load on the database host. I am doing this on a standalone RHEL 7 64 Bit server which I will be using it both as a PEM server and local instance. Alright, so without further ado, lets start. So, first you need to download EDB’s official repository and install following package.
Below is a complete list of packages available with name ‘edb-pem’, you need to install version: edb-pem-8.0.1-1.rhel7.x86_64
=================================================================== N/S matched: edb-pem ====================================================================
edb-pem-debuginfo.x86_64 : Debug information for package edb-pem
edb-pem.x86_64 : PostgreSQL Enterprise Manager
edb-pem-agent.x86_64 : Postgres Enterprise Manager Agent
edb-pem-docs.x86_64 : Documentation for Postgres Enterprise Manager
edb-pem-server.x86_64 : PEM Server Components
Once installation is completed, go to the default installation directory, it’s /usr/edb in my case, and go to pem/bin folder.
[root@canttowin ~]# cd /usr/edb/
[root@canttowin edb]# ls
as12 bart efm-4.1 jdbc migrationtoolkit pem pgbouncer1.15 pgpool4.2
[root@canttowin ~]# cd /usr/edb/pem/bin/
[root@canttowin bin]# ls
configure-pem-server.sh configure-selinux.sh
We see two configuration shell scripts are present, we will be using the configuration script – configure-pem-server.sh Here I will be choosing option 1 which means I will be installing web services and databases all on one host, next you need to input installation path (/usr/edb/as12 in my case), followed by super user name, port numbers and IP Address of the server.
Before I call the config script, let me quickly reset the default superuser’s password.
postgres=# alter user postgres with password 'dixit';
ALTER ROLE
Now, let’s call the configuration scipt and pass all discussed values.
[root@canttowin bin]# ./configure-pem-server.sh
-----------------------------------------------------
EDB Postgres Enterprise Manager
-----------------------------------------------------
Install type: 1:Web Services and Database, 2:Web Services 3: Database [ ] :1
Enter local database server installation path (i.e. /usr/edb/as12 , or /usr/pgsql-12, etc.) [ ] :/usr/edb/as12
Enter database super user name [ ] :enterprisedb
Enter database server port number [ ] :5444
Enter database super user password [ ] :
Please enter CIDR formatted network address range that agents will connect to the server from, to be added to the server's pg_hba.conf file. For example, 192.168.1.0/24 [ 0.0.0.0/0 ] :10.0.0.153/32
Enter database systemd unit file or init script name (i.e. edb-as-12 or postgresql-12, etc.) [ ] :edb-as-12Please specify agent certificate path (Script will attempt to create this directory, if it does not exists) [ ~/.pem/ ] :
CREATE EXTENSION
[Info] Configuring database server.
CREATE DATABASE
CREATE ROLE
CREATE ...
..
..
..
CREATE EXTENSION
--> [Info] --> [Info] Configuring database server.
--> [Info] --> [Info] creating role pem
--> [Info] --> [Info] Generating certificates
--> [Info] --> [Info] Executing systemctl stop edb-as-12
--> [Info] --> [Info] Skipping - configurations for /var/lib/edb/as12/data/pg_hba.conf and /var/lib/edb/as12/data/postgresql.conf file
--> [Info] --> [Info] Executing systemctl start edb-as-12
--> [Info] --> [Info] Enable pemagent service.
--> [Info] --> [Info] Executing systemctl enable pemagent
--> [Info] --> [Info] Stop pemagent service
--> [Info] --> [Info] Executing systemctl stop pemagent
--> [Info] --> [Info] Start pemagent service.
--> [Info] --> [Info] Executing systemctl start pemagent
--> [Info] --> [Info] Configuring httpd server
--> [Info] --> [Info] Executing systemctl stop httpd
--> [Info] --> [Info] Taking backup of /usr/edb/pem/web/pem.wsgi
--> [Info] --> [Info] Creating /usr/edb/pem/web/pem.wsgi
--> [Info] --> [Info] Taking backup of /usr/edb/pem/web/config_local.py.
--> [Info] --> [Info] Generating PEM Cookie Name.--> [Info] --> [Info] Creating /usr/edb/pem/web/config_local.py
--> [Info] --> [Info] Taking backup of /etc/httpd/conf.d/edb-pem.conf
--> [Info] --> [Info] Creating /etc/httpd/conf.d/edb-pem.conf
--> [Info] --> [Info] Configuring httpd server sslconf
--> [Info] --> [Info] Taking backup of /etc/httpd/conf.d/edb-ssl-pem.conf
--> [Info] --> [Info] Taking backup of /etc/httpd/conf.d/edb-ssl-pem.conf
--> [Info] --> [Info] Executing /usr/edb/pem/web/setup.py
Postgres Enterprise Manager - Application Initialisation
========================================================
--> [Info] --> [Info] Check and Configure SELinux security policy for PEM
getenforce found, now executing 'getenforce' command
Configure the httpd to work with the SELinux
Allow the httpd to connect the database (httpd_can_network_connect_db = on)
Allow the httpd to connect the network (httpd_can_network_connect = on)
Allow the httpd to work with cgi (httpd_enable_cgi = on)
Allow to read & write permission on the 'pem' user home directory
SELinux policy is configured for PEM
--> [Info] --> [Info] Executing systemctl start httpd
--> [Info] --> [Info] Configured the webservice for EDB Postgres Enterprise Manager (PEM) Server on port '8443'.
--> [Info] --> [Info] PEM server can be accessed at https://127.0.0.1:8443/pem at your browser
It’s completed, and at the very end it has provided URL to access the PEM GUI.
Now next step is to install PEM Agents to the server, you need to install it on all servers which you want to monitor, I am leaving the PEMAgents configuration that you do in agent.cfg file.
[root@canttowin bin]# yum install edb-pem-agent
Let’s check the PEM GUI now.
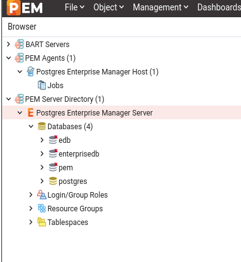
Here on the left panel you will notice there’s already one database present under ‘PEM Server Directory’ folder, this is the same database which we have configured/used PEM server, hence it will be automatically added to the server list. We will manually add one more database cluster to explain how to do it explicitly.
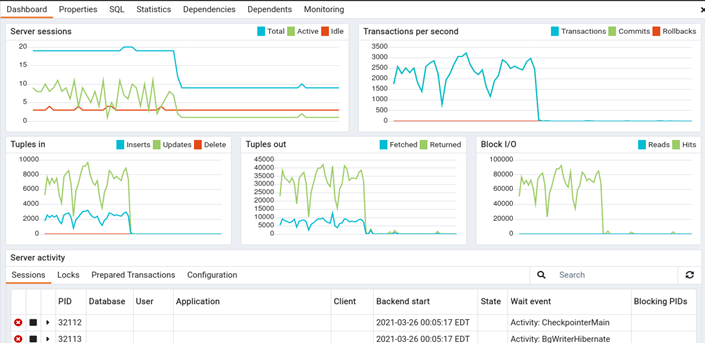
Let’s check the dashboard for the same (PEM Server) database for session, TPS, IO related details.
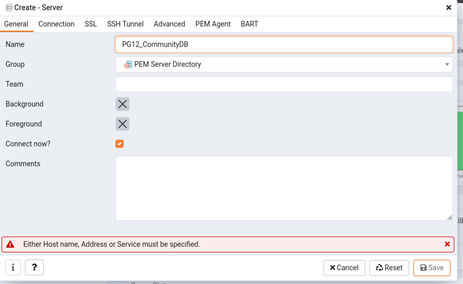
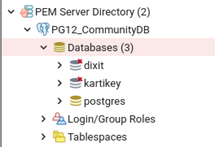
Now, let’s add another database to the monitoring console. I will be adding a community PostgreSQL 12 database to it. Go to ‘PEM Server Directory’ folder right click on it, choose option create-> server.
Next, fill connection wizard with all details i.e, username, password, IP, port and security related details for the new database and click save at the end.
And you are done!
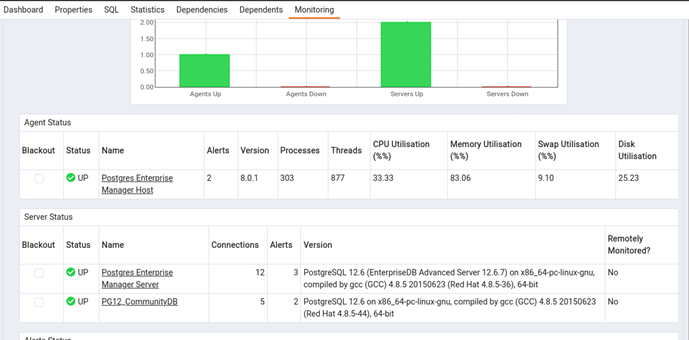
Now, let’s see the default landing page of PEM GUI and here you see details of all added hosts and agents with their status.
Next I will create some new databases to see how that data reflects in PEM GUI. postgres=# postgres=# create database dixit; CREATE DATABASE postgres=# create database kartikey; CREATE DATABASE
All good! now let’s do some performance test to see how useful PEM can be in case of performance issues. In order to mimic or simulate the situation, I will generating some synthetic load using PostgreSQL’s default utility Pgbench.
Reference: -c number of clients -j 2 number of threads -t amount of transactions
These values are 10000 transactions per client. So : 10 x 10000 = 100,000 transactions
Let’s see how the changes are captured and presented in PEM.
Okay, we can see the peaks are recorded and presented.
The load is still running and we can clearly see that from the below graph.
[postgres@canttowin bin]$ ./pgbench -U postgres -p 5432 -c 10 -j 2 -t 10000 postgres starting vacuum…end.transaction type: scaling factor: 1 query mode: simple number of clients: 10 number of threads: 2 number of transactions per client: 10000 number of transactions actually processed: 100000/100000 latency average = 18.217 ms tps = 548.940142 (including connections establishing) tps = 548.970173 (excluding connections establishing)
Alright, so the load run has ended, let see how the graph now looks like.
So to conclude, PEM is a great tool which can fulfil all your monitoring needs, it has got some cool features too i.e. performance dashboards, tuning wizards, advisories and other graphs.